Installing pgBackRest on OSX
If you’ve followed my previous posts (here and here), then you already have one or more versions of PostgreSQL installed on your Mac. Maybe these are solely for test or dev purposes and you don’t really care about any of the data therein, but if you do, let me guide you to pgBackRest.
pgBackRest aims to be a simple, reliable backup and restore system that can seamlessly scale up to the largest databases and workloads.
Instead of relying on traditional backup tools like tar and rsync, pgBackRest implements all backup features internally and uses a custom protocol for communicating with remote systems. Removing reliance on tar and rsync allows for better solutions to database-specific backup challenges. The custom remote protocol allows for more flexibility and limits the types of connections that are required to perform a backup which increases security.
pgBackRest is written in Perl, but don’t hold that against it. As of the 1.19 release, pgBackRest can now use S3 buckets as the storage backend. I really like pgBackRest and tend to use it for myself and customers over any of the other tools in the PostgreSQL ecosphere. So, let’s get started by downloading the latest release from their site, and then installing it. For some reason, no one has added pgBackRest to Homebrew yet (someone, pls!) so let’s do it the manual way:
$ wget -o Downloads/pgbackrest-release-1.19.tar.gz https://github.com/pgbackrest/pgbackrest/archive/release/1.19.tar.gz
$ tar xvf Downloads/pgbackrest-release-1.19.tar.gz
$ cd pgbackrest-release-1.19
$ sudo cp -r lib/pgBackRest /Library/Perl/5.18
$ sudo find /Library/Perl/5.18/pgBackRest -type f -exec chmod 644 {} +
$ sudo find /Library/Perl/5.18/pgBackRest -type d -exec chmod 755 {} +
$ sudo mv bin/pgbackrest /usr/local/bin
$ sudo chmod 755 /usr/local/bin/pgbackrest
$ sudo mkdir -m 770 /var/log/pgbackrest
$ sudo mkdir -m 770 /var/spool/pgbackrest
$ sudo chown doug /var/{log,spool}/pgbackrest
(Keep in mind that I already had Perl setup to connect to PostgreSQL for other uses. You might need to install DBD::Pg.)
Now that pgBackRest is installed, let’s configure it. First, we’ll want to set some of the global properties that affect all pgBackRest operations:
[global]
log-level-console=info
repo-s3-bucket=hunleyd-pgbackrest
repo-s3-endpoint=s3.amazonaws.com
repo-s3-key=XX
repo-s3-key-secret=XXX
repo-s3-region=us-east-2
repo-type=s3
retention-full=2
start-fast=y
As you can see, we set the following:
- force the log level for all console output to ‘info’
- define the S3 bucket we want to use
- define the S3 endpoint to connect to
- define our S3 key
- define our S3 secret key
- set which region our bucket is in
- tell pgBackRest that we’re using S3 as the backend
- configure retention of full backups
- tell pgBackRest to issue a CHECKPOINT so backups can start right away instead of waiting for the next regular checkpoint
Now, we need to tell pgBackRest which instance of PostgreSQL we want to backup and where to find it. Again, if you used my previous posts to install multiple versions via Homebrew, this should look familiar:
[96]
db-path=/usr/local/var/postgres/9.6
db-port=5496
repo-path=/96

[95]
db-path=/usr/local/var/postgres/9.5
db-port=5495
repo-path=/95

[94]
db-path=/usr/local/var/postgres/9.4
db-port=5494
repo-path=/94

[93]
db-path=/usr/local/var/postgres/9.3
db-port=5493
repo-path=/93

[92]
db-path=/usr/local/var/postgres/9.2
db-port=5492
repo-path=/92

[91]
db-path=/usr/local/var/postgres/9.1
db-port=5491
repo-path=/91

[90]
db-path=/usr/local/var/postgres/9.0
db-port=5490
repo-path=/90
You can see for each pg cluster, we define:
- the path to the
$PGDATAdirectory - the port the cluster listens on
- and the path we want to store the backups in on our backend
When you put this all together, we’ll be connecting to an S3 bucket called, creatively enough, hunleyd-pgbackrest and then we will create a top-level directory (‘96’, ‘95’, etc) to store each cluster’s backups in.
Now that we’ve got our configuration complete, let’s do an initial backup of one of the clusters. First, we have to create the appropriate directories and metadata on the backend:
$ pgbackrest --stanza=92 --config $HOME/.config/pgbackrest/pgbackrest.conf stanza-create
2017-06-14 14:03:46.643 P00   INFO: stanza-create command begin 1.19: --config=/Users/doug/.config/pgbackrest/pgbackrest.conf --db-path=/usr/local/var/postgres/9.2 --db-port=5492 --log-level-console=info --repo-path=/92 --repo-s3-bucket=hunleyd-pgbackrest --repo-s3-endpoint=s3.amazonaws.com --repo-s3-region=us-east-2 --repo-type=s3 --stanza=92
2017-06-14 14:03:57.971 P00   INFO: stanza-create command end: completed successfully
Then, we have pgBackRest verify that everything is properly setup. Note that this includes checking to ensure you tweaked postgresql.conf according to the directions on their site (I’m not going to repeat them here):
$ pgbackrest --stanza=92 --config $HOME/.config/pgbackrest/pgbackrest.conf check
2017-06-14 14:04:17.991 P00   INFO: check command begin 1.19: --config=/Users/doug/.config/pgbackrest/pgbackrest.conf --db-path=/usr/local/var/postgres/9.2 --db-port=5492 --log-level-console=info --repo-path=/92 --repo-s3-bucket=hunleyd-pgbackrest --repo-s3-endpoint=s3.amazonaws.com --repo-s3-region=us-east-2 --repo-type=s3 --stanza=92
2017-06-14 14:04:32.576 P00   INFO: WAL segment 000000010000000000000067 successfully stored in the archive at '/92/archive/92/9.2-1/0000000100000000/000000010000000000000067-24adde40a35b1f3ed17f545153f0e01c44b0ada5.gz'
2017-06-14 14:04:32.576 P00   INFO: check command end: completed successfully
And since that all worked, we can take our first actual backup:
$ pgbackrest --stanza=92 --config $HOME/.config/pgbackrest/pgbackrest.conf backup
2017-06-14 14:10:44.378 P00   INFO: backup command begin 1.19: --config=/Users/doug/.config/pgbackrest/pgbackrest.conf --db-path=/usr/local/var/postgres/9.2 --db-port=5492 --log-level-console=info --repo-path=/92 --repo-s3-bucket=hunleyd-pgbackrest --repo-s3-endpoint=s3.amazonaws.com --repo-s3-region=us-east-2 --repo-type=s3 --retention-full=2 --stanza=92 --start-fast
WARN: no prior backup exists, incr backup has been changed to full
2017-06-14 14:10:49.435 P00   INFO: execute exclusive pg_start_backup() with label "pgBackRest backup started at 2017-06-14 14:10:45": backup begins after the requested immediate checkpoint completes
2017-06-14 14:10:49.846 P00   INFO: backup start archive = 000000010000000000000068, lsn = 0/68000020
2017-06-14 14:10:57.090 P01   INFO: backup file /usr/local/var/postgres/9.2/pg_log/2017/week-16/index.html (1.3MB, 3%) checksum dcc73afe15f48863eb019b9cfbb1e24cbd2a4d7f
<snip>
2017-06-14 14:24:23.277 P01   INFO: backup file /usr/local/var/postgres/9.2/base/1/12040 (0B, 100%)
2017-06-14 14:24:23.964 P01   INFO: backup file /usr/local/var/postgres/9.2/base/1/12031 (0B, 100%)
2017-06-14 14:24:24.747 P01   INFO: backup file /usr/local/var/postgres/9.2/base/1/12021 (0B, 100%)
2017-06-14 14:24:24.778 P00   INFO: full backup size = 38.1MB
2017-06-14 14:24:24.778 P00   INFO: execute exclusive pg_stop_backup() and wait for all WAL segments to archive
2017-06-14 14:24:41.428 P00   INFO: backup stop archive = 000000010000000000000068, lsn = 0/68000178
2017-06-14 14:24:45.320 P00   INFO: new backup label = 20170614-141045F
2017-06-14 14:24:47.844 P00   INFO: backup command end: completed successfully
2017-06-14 14:24:47.920 P00   INFO: expire command begin 1.19: --config=/Users/doug/.config/pgbackrest/pgbackrest.conf --log-level-console=info --repo-path=/92 --repo-s3-bucket=hunleyd-pgbackrest --repo-s3-endpoint=s3.amazonaws.com --repo-s3-region=us-east-2 --repo-type=s3 --retention-archive=2 --retention-full=2 --stanza=92
2017-06-14 14:24:50.496 P00   INFO: full backup total < 2 - using oldest full backup for 9.2-1 archive retention
2017-06-14 14:24:51.796 P00   INFO: expire command end: completed successfully
Neat!
Now, let’s check our S3 bucket, shall we?
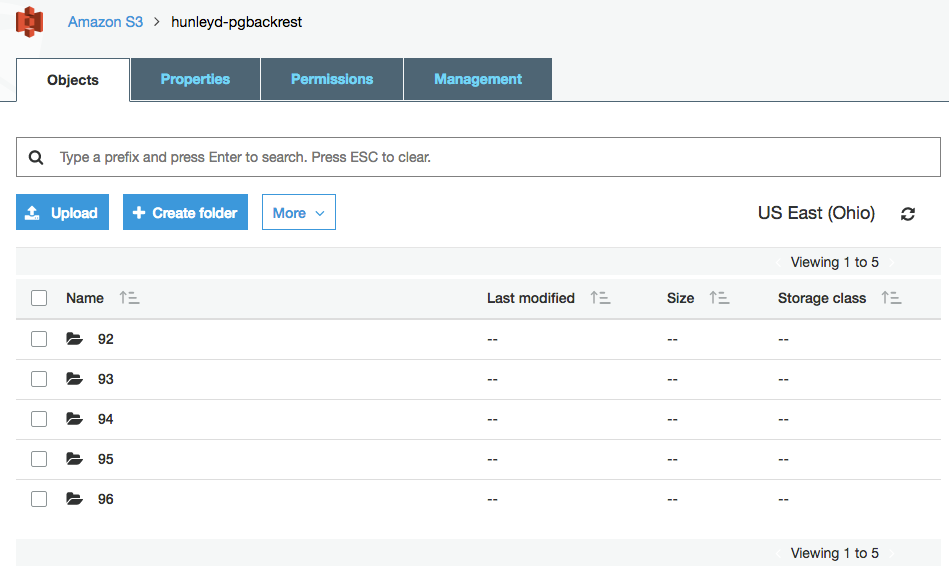
You can see here the top-level contents of my hunleyd-pgbackrest bucket. As stated before, each cluster gets its own sub-dir. Since we just backed up the ‘92’ cluster, let’s look inside it’s dir.
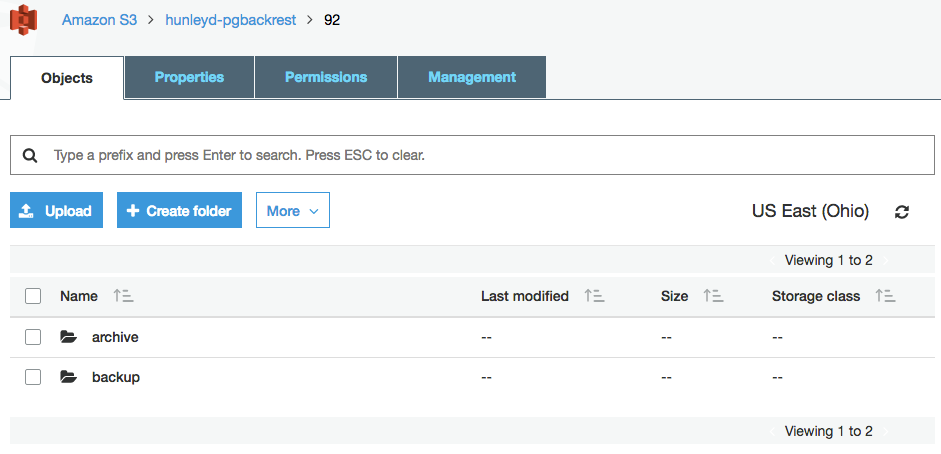
You can see that pgBackRest has created as directory for the WALs to be stored in whenever archive_command fires and another directory for the actual cluster backups. Peeking into the archive dir, we see:
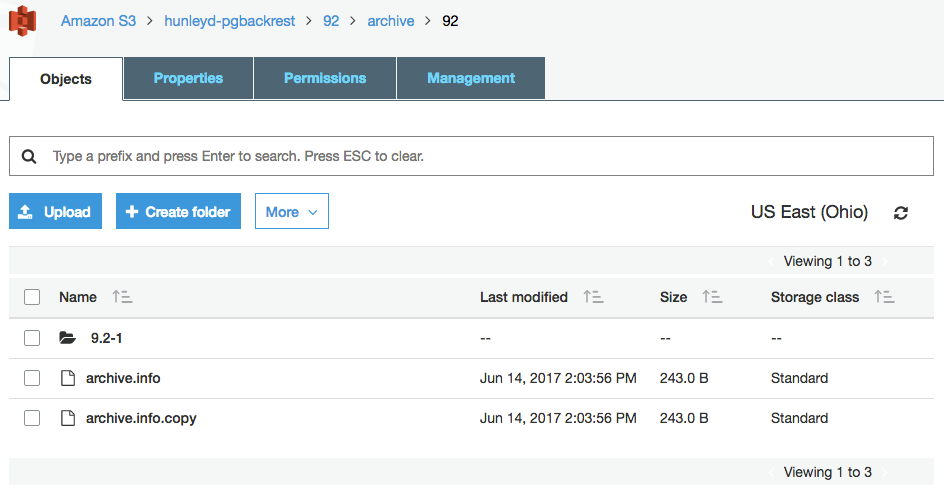
This shows us some metadata, and shows that pgBackRest creates a directory for each timeline of the cluster. Since we are on timeline 1 in our 92 cluster, we have a 9.2-1 directory inside of which, we find:
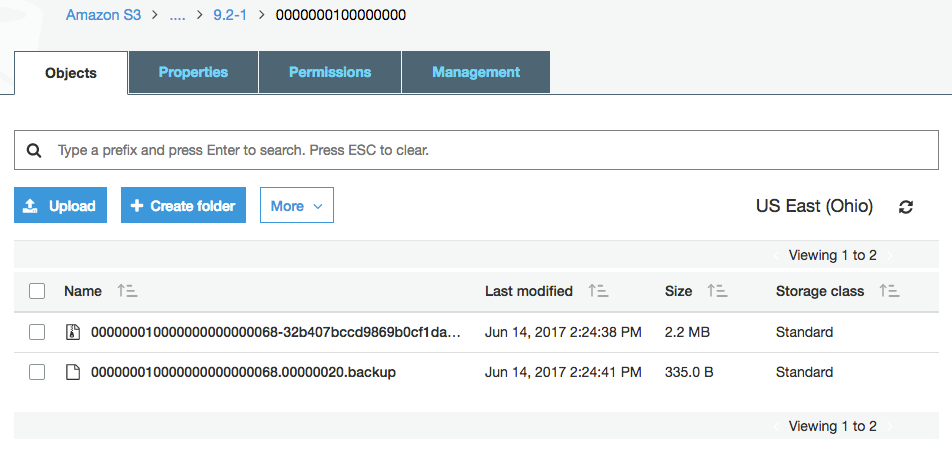
Our archived WALs have been compressed and uploaded. Hurray!
Now, let’s check inside the backup directory:
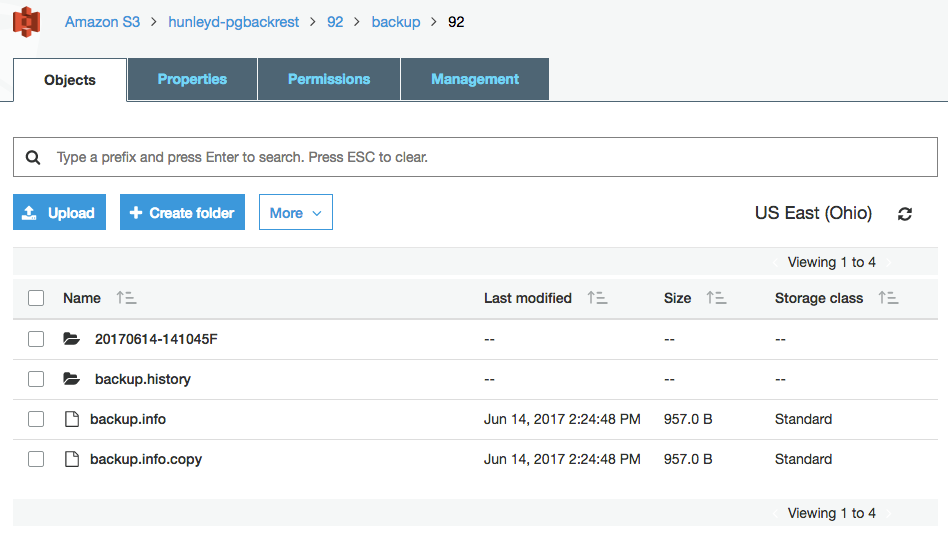
We can see some metadata, and we can see a folder named the same as the backup label that was used when we ran our full backup. Inside that folder, we can see:
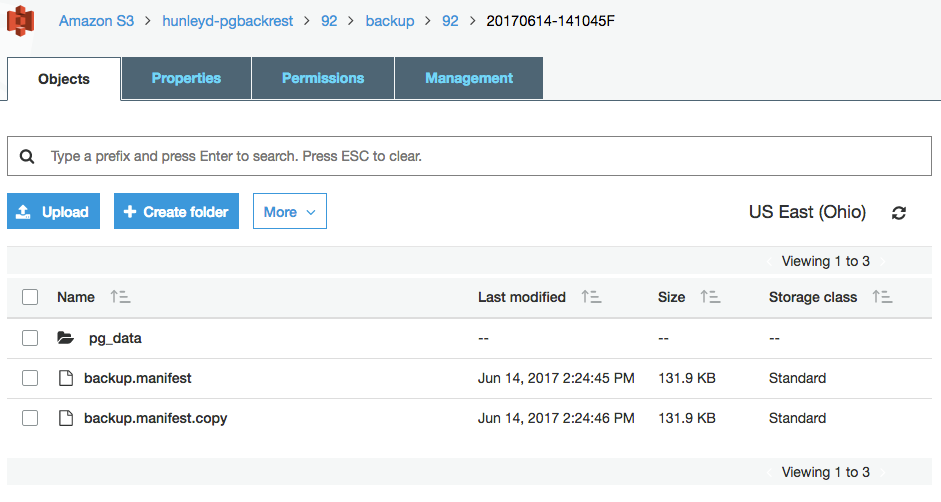
Hey look, more metadata! And another folder! :) So, let’s dive into the pg_data folder where we see:
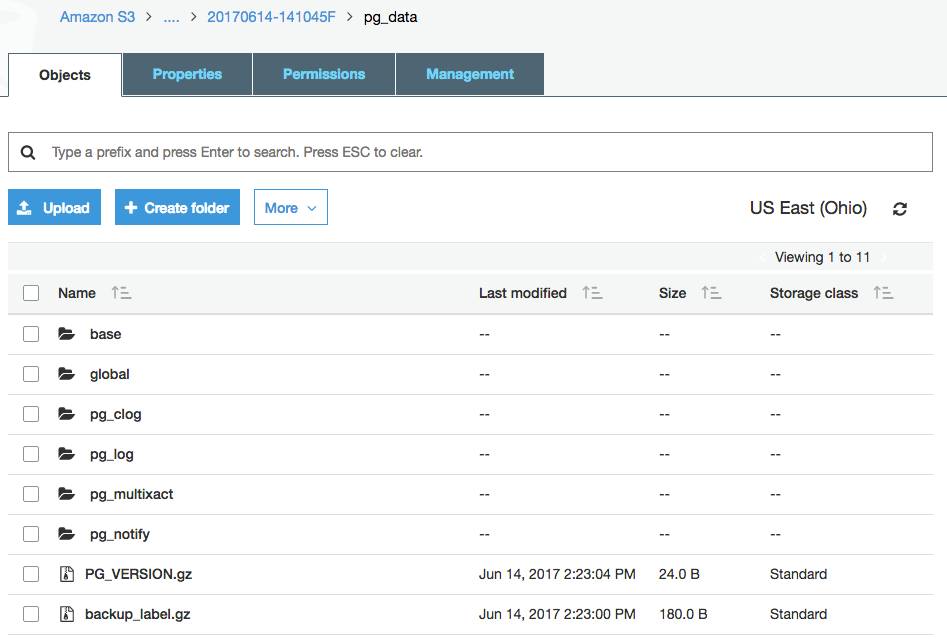
Holy crap! It’s a basebackup of our $PGDATA data directory. And all the files have been nicely compressed for us. Rock on, pgBackRest!
And just in case you wanted to see the current backup catalog:
$ pgbackrest --stanza=92 --config $HOME/.config/pgbackrest/pgbackrest.conf info
stanza: 92
    status: ok
    wal archive min/max: 000000010000000000000068 / 000000010000000000000068

    full backup: 20170614-141045F
        timestamp start/stop: 2017-06-14 14:10:45 / 2017-06-14 14:24:43
        wal start/stop: 000000010000000000000068 / 000000010000000000000068
        database size: 38.1MB, backup size: 38.1MB
        repository size: 5.6MB, repository backup size: 5.6MB
(look at that compression!)